


Fall is definitely one of my favorite times of the year! I really love decorating for fall, too. It’s just so much fun, and I really have a thing for pumpkins. I’d love to share this super easy Lighted Pumpkin Sign that I made with a little help from Command Brand. This sign is so, so simple to put together, but at the same time it makes a huge statement. I love it!
Let’s get started!
Supplies:
4 six foot cedar fence boards
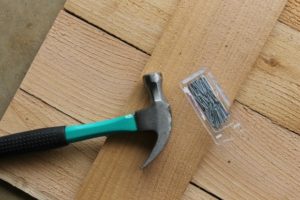
1 1/2 inch brad nails
Hammer
Wood glue
Circular saw
3 hexagon shadow boxes (I found these at Target in the craft aisle.)
Orange spray paint
Dark wax
Old rag
Branch (cut into three 2 3/4 inch pieces)
Twine
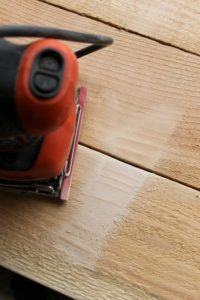
Hand sander
Sandpaper
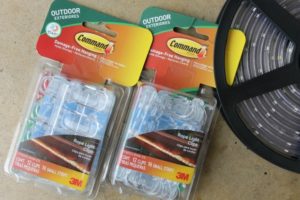
Command Small Picture Hanging Strips
Command Outdoor Rope Light Clips
15 foot rope light
Clamps
*This Lighted Pumpkin Sign is best for indoor use. Do not leave the sign outside for an extended period of time.
First, cut your fence boards into the following lengths with your circular saw.
(2) 21 1/2 inch pieces
(4) 36 inch pieces
*Please use caution, follow safety rules and use eye protection when using power tools. Create at your own risk!
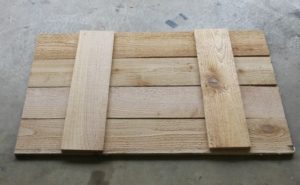
I used a hammer and some 1 1/2 inch brad nails to attach the boards together.
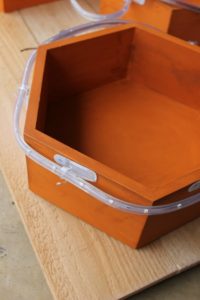
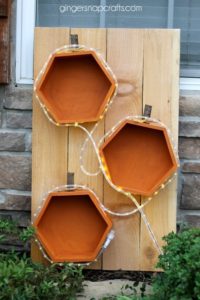
Next, I painted my hexagon shadow boxes. Let them dry. Then I gave them a good coating of dark brown wax using an old rag.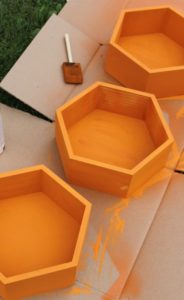
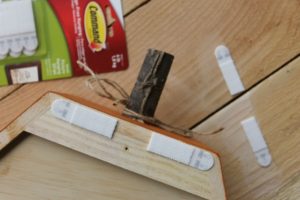
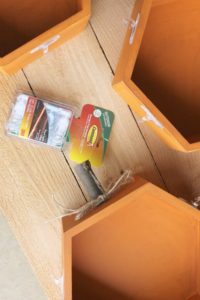
Then I used some wood glue to attach the “pumpkin stems.” I clamped them on and let dry. Then I tied on some twine around the stems.

To attach my pumpkins to my sign I used Command Small Picture Hanging Strips. I love these hanging strips. I used them all over my house. I love that you can totally forget about using nails, screws, or thumb tacks (which would of been totally tacky with this pumpkin sign!). Command Small Picture Hanging Strips are super fast and simple to use. They stick to so many surfaces, including painted surfaces, wood (like these pumpkins and wood sign), tile, and much more. I also love that they come off easily, too leaving no holes, marks, or sticky mess behind.
When using Command Brand, I always look in the top corner of the packaging to see how much weight this particular product will hold. The small picture hanging strips will hold four pounds and are designed for using with 8×10 picture frames. My hexagon pumpkins were about that same size, just a slightly different shape, so I knew these would work. You can find more weigh limits and guidelines on the Command Brand website at command.com.
Tip: My daughter is already making plans to repaint these hexagon shadow boxes, and then she wants to use them in her room after the fall décor season is over. So Command Brand makes rehanging and reusing them as easy as applying a Command Clear Refill Strip, so we will be able to take them down, paint them, and then hang them again and again!

These Command small picture hanging strips need to be applied to a smooth surface. These cedar fence boards weren’t exactly smooth. So, I marked with a pencil exactly where I would be hanging my boxes and sanded a spot completely smooth for where the small picture hanging strips would be sticking to. Next, I cleaned that spot with an alcohol wipe and let dry.
Then I applied the small picture hanging strips according to the package directions. Rub them in place for 30 seconds. Then wait an hour before hanging.
Tip: These Command Small Picture Hanging Strips are for indoor use.
To make the pumpkin sign lighted I used two packages of Command Outdoor Rope Light Clips and a 15 foot rope light.
Tip: The Command Outdoor Rope Light Clips are approved for outdoor use. They will be awesome for hanging Christmas lights in a few months. They can be attached to just about any smooth outdoor surface like doors, siding, trim, and windows. They can handle temperatures between -20 degrees to 125 degrees. They are tough!
Tip: If you are using these outdoor rope light clips on a freshly painted surface (like I did) it’s best to wait seven days before applying!
I simply followed the package directions (similar to the picture hanging strips) and attached the outdoor rope light clips around my pumpkins. Don’t forget to wait an hour before hanging your lights!
Next, I threaded the lights through the outdoor rope light clips. All done!
It will be perfect for all my fall entertaining, and my kids get a kick out of our very own lighted pumpkin patch! It would also make a cute photo prop for fall pictures.
