


Time to get some projects marked off my to-do list! Making a giant peg board has been on my list for a long time, and it’s finally finished. It was so easy to put together. I’m not sure what took us so long to make this giant peg board. It’s definitely an afternoon project, and it doesn’t take long to get up at all. It it awesome for organizing all of my craft supplies, and it would make a great addition to any work space. So keep reading, and I’ll show you how to make a giant peg board. Let’s get to it!
First, you’ll need to measure how big you want to make your peg board. I measured my space and decided to make a 4 foot wide by 3 foot tall peg board. You can buy peg board sheets at Home Depot or any home improvement store. I bought a 4 foot by 4 foot sheet. So before we got started we trimmed a foot off the top of my peg board with a table saw.
You’ll need a few other supplies to get started:
trim
1×2 boards
nail gun and nails
wood glue
paint
paint brush
caulk and caulking gun
table saw
Miter saw
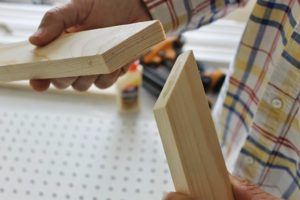
First, you’ll make a frame using the 1×2 boards. Trim the ends of your boards with a Miter saw to a 45 degree angle so they fit together. Since my peg board was 4 foot by 3 foot I made my frame the same size. Use a little bit of wood glue and a nail gun to attach your frame together. Let dry.
I gave my peg board a fresh coat of white paint. You don’t necessarily have to do this step if you don’t want to. I just think everything looks better freshly painted. Plus, I used the same paint that I was going to use on the trim and frames, so it all ended up all matching in the end.
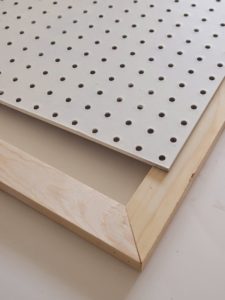
We also made a 4 foot by 3 foot frame using some wood trim the same exact way we did the 1×2 frame. You’ll need a frame for the front and back of your peg board. The peg board needs to be up away from the wall for the peg hooks to fit in. So the 1×2 frame on the back gives it just enough space between the wall to hang your peg hooks and baskets in.
Using a nail gun we nailed the peg board to the 1×2 frame. Just go all the way around every two or three inches or so. For some extra reinforcement, put a thin layer of wood glue between the frame and the peg board before you start nailing.
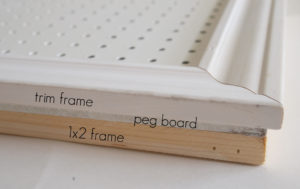
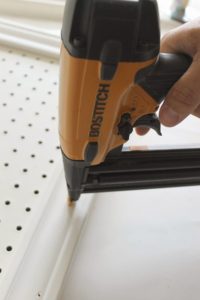
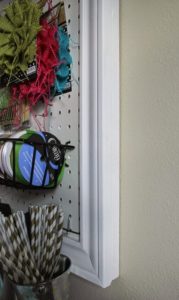
Put a thin layer of wood glue around the edge of the peg board then sit the nicer trim frame right on top of the peg board, using your nail gun again to nail all the way around your peg board. Let the wood glue dry.
I then used a caulk gun to fill in the joints of the trim frame where the wood met and the nail holes. Then I gave the frame one more coat of paint and painted around the edge of the frames so that no wood was showing just nice white edges. The edges will look like the ones below.
To hang this giant peg board up we just used a stud finder to find the studs in the wall, put some screws in the studs and hung the peg board on the screws. All done.
All that was left to do was fill my space with craft supplies!

